PowerShell: Getting Started - Utilizing the Web: Part 3 (More Invoke-RestMethod)
•8 min read•Ginja


Welcome to my Getting Started with Windows PowerShell series!
In case you missed the earlier posts, you can check them out here:
- Customizing your environment
- Command discovery
- Using the ISE and basic function creation
- A deeper dive into functions
- Loops
- Modules
- Help
- Accepting pipeline input
- Strings
- Jobs
- Error handling
- Creating Custom Objects
- Working with data
- Utilizing the Web: Part 1 (Invoke-WebRequest)
- Utilizing the Web: Part 2 (Invoke-RestMethod)
We will be exploring:
- A continuation of using Invoke-RestMethod
- API key in header (LIFX API)
- Sending data to a REST API via Body (LIFX API)
- Username/Password in request URL (PRTG API)
- Sending data via URL (PRTG API)
- Homework
Keep an eye out for part 4!
Part 4 will contain:
- Controlling the Internet Explorer COM Object
- Navigating to pages
- Logging in to pages
In part 2, we went over Invoke-RestMethod's basics, including:
In this post, I will be going over some more ways to use Invoke-RestMethod to authenticate to different APIs. I will also go over how to send information to the API, and work with the results we get back.
Some APIs will require you to authenticate with a key in the header information. I happen to own a LIFX light, and their API uses that method of authentication.
If you own a LIFX light, and want to follow along, you can get a personal access token here: https://cloud.lifx.com/settings.
Information recap:
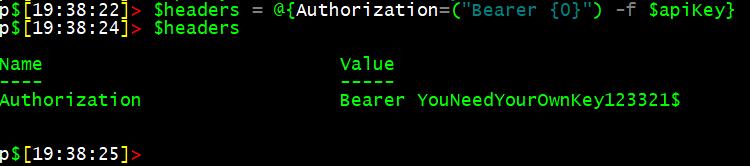
Now let's get to work! I have my key, which let's just say is: 'YouNeedYourOwnKey123321$'
Let's store that in a variable.
The next step here is to store that key in the header information (as a hashtable), with the key name of "Authorization".
Let's take a peek at $headers to ensure it contains what we need.
Looks good! Now to check it out. The URL in the documentation to get the lights available is 'https://api.lifx.com/v1/lights/all'. I like to store information like this in variables.
Now to put it all to use! We'll be utilizing Invoke-RestMethod with the following parameters/arguments:
- Headers
- Since we already have our headers stored in a nifty hashtable, we'll simply specify $headers
- Uri
- We'll pass along $allURL, and attempt to get a list of available lights
Here's all of the code so far.
We'll be storing the results of the Invoke-RestMethod command in $ninjaLights.
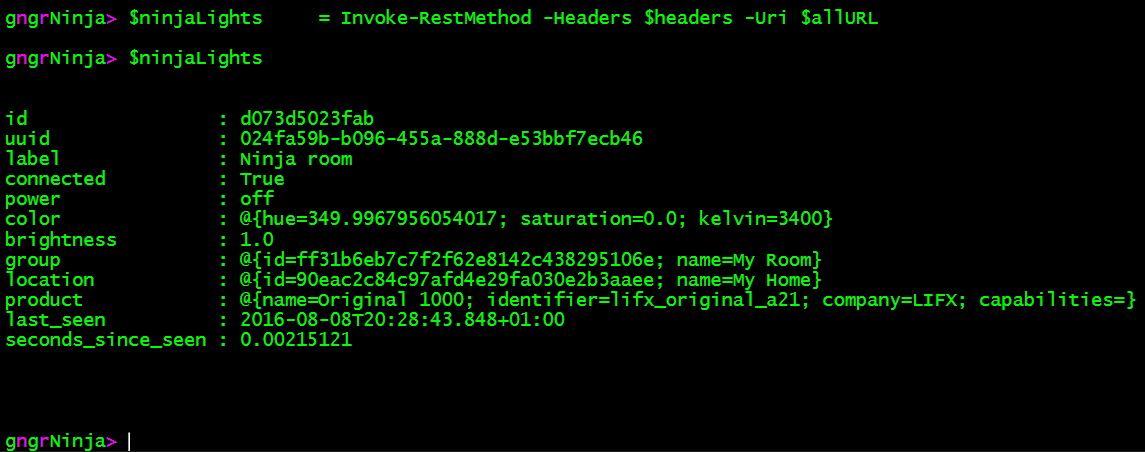
Success!
Now that we've authenticated to LIFX, we can work on sending information over, and control the light. Here are the steps I generally follow when using an API for the first time:
- Review documentation
- Review documentation (This can't be emphasized enough)
- In this case, reviewing: https://api.developer.lifx.com/docs/set-state
- Test out a bunch of different ways to utilize the API
- Get errors, handle errors, see what's expected, clean up the code, and build a function
Here is a snippet from their documentation:
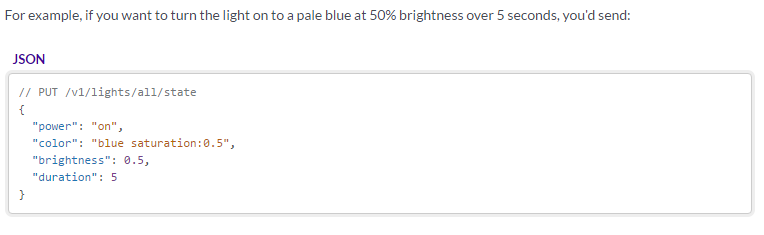
What that tells us is how the text is to be formatted (JSON), and that we'll be using the PUT method.
Here are the parameters they accept:

Let's get started by ensuring we have working code, and then build a function around it.
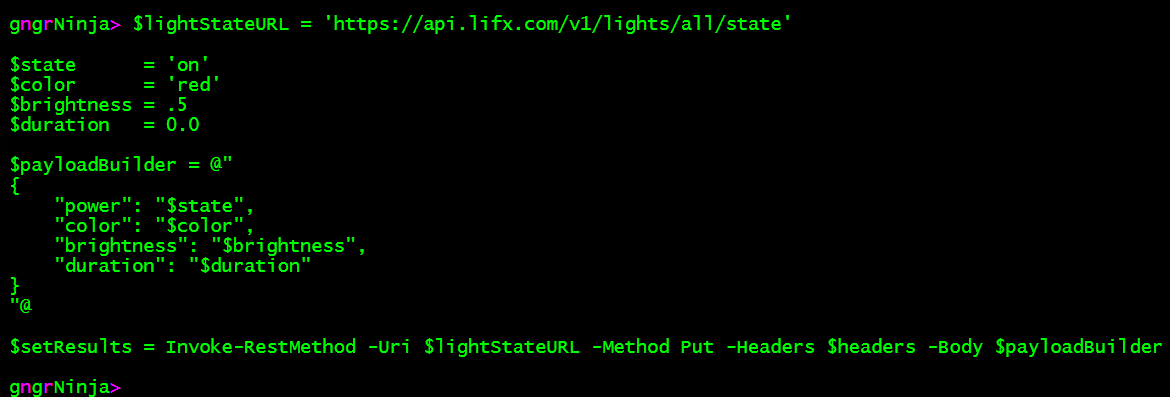
The URL is 'https://api.lifx.com/v1/lights/all/state', which we'll store in $lightStateURL. We'll also setup some variables for the accepted parameters, as follows:
- $state
- on or off, we'll choose on
- $color
- We'll set this to red
- $brightness
- We'll set this to .5, or 50%
- $duration
- This will be set to .0, which is indefinitely
After setting up these variables, we'll use a here-string to build the payload, and finally use Invoke-RestMethod with the following parameters/arguments:
- Uri
- The $lightStateURL variable
- Method
- We'll be using PUT, per their documentation
- Headers
- We'll use the headers from the Base64 example above
- Body
- We will set this to $payloadBuilder (which is the here-string that contains the parameters we're passing to the LIFX API)
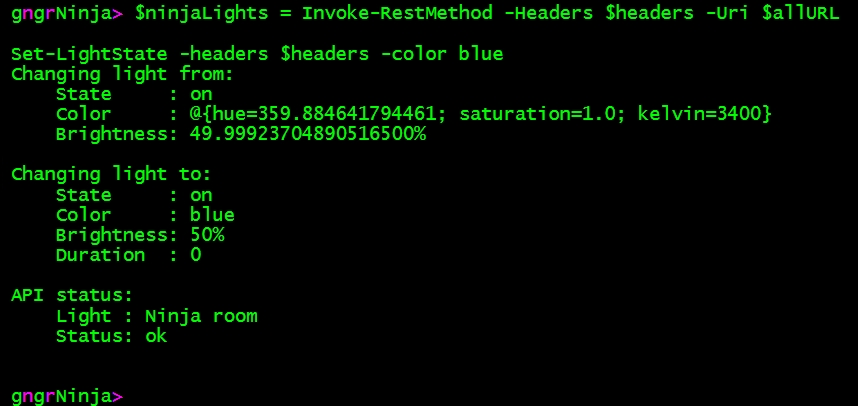
Here is the full code so far to test this:
Let's go ahead and run that to see if it worked:
This is an easy one to verify!
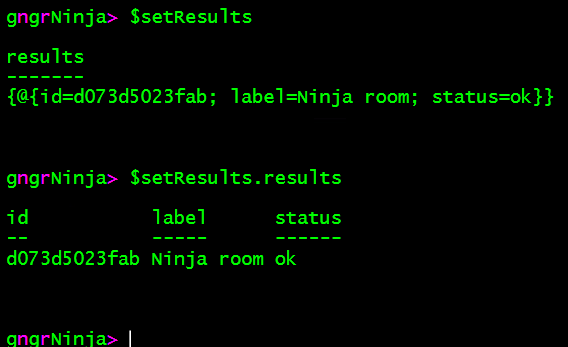
We can also take a look at the results property of $setResults.
Now that we know that it works, it can be used in a function to control the light.
Here is the code for an example of how to build a function with this information:
Let's see what happens when we run it!
(NOTE) I use Write-Host here merely as a tool to give you a visual of the data you are working with. Ultimately it would be best to create some custom objects, and return the results as you need to with the code you're writing.
The information here is provided to show you what you can do, how you can build a payload, and then work with the data you are returned. You can do anything you put your mind to, from silly things (the next example), to even using it with another script (that may get weather information), and then flash the light red a few times if there is a weather alert.
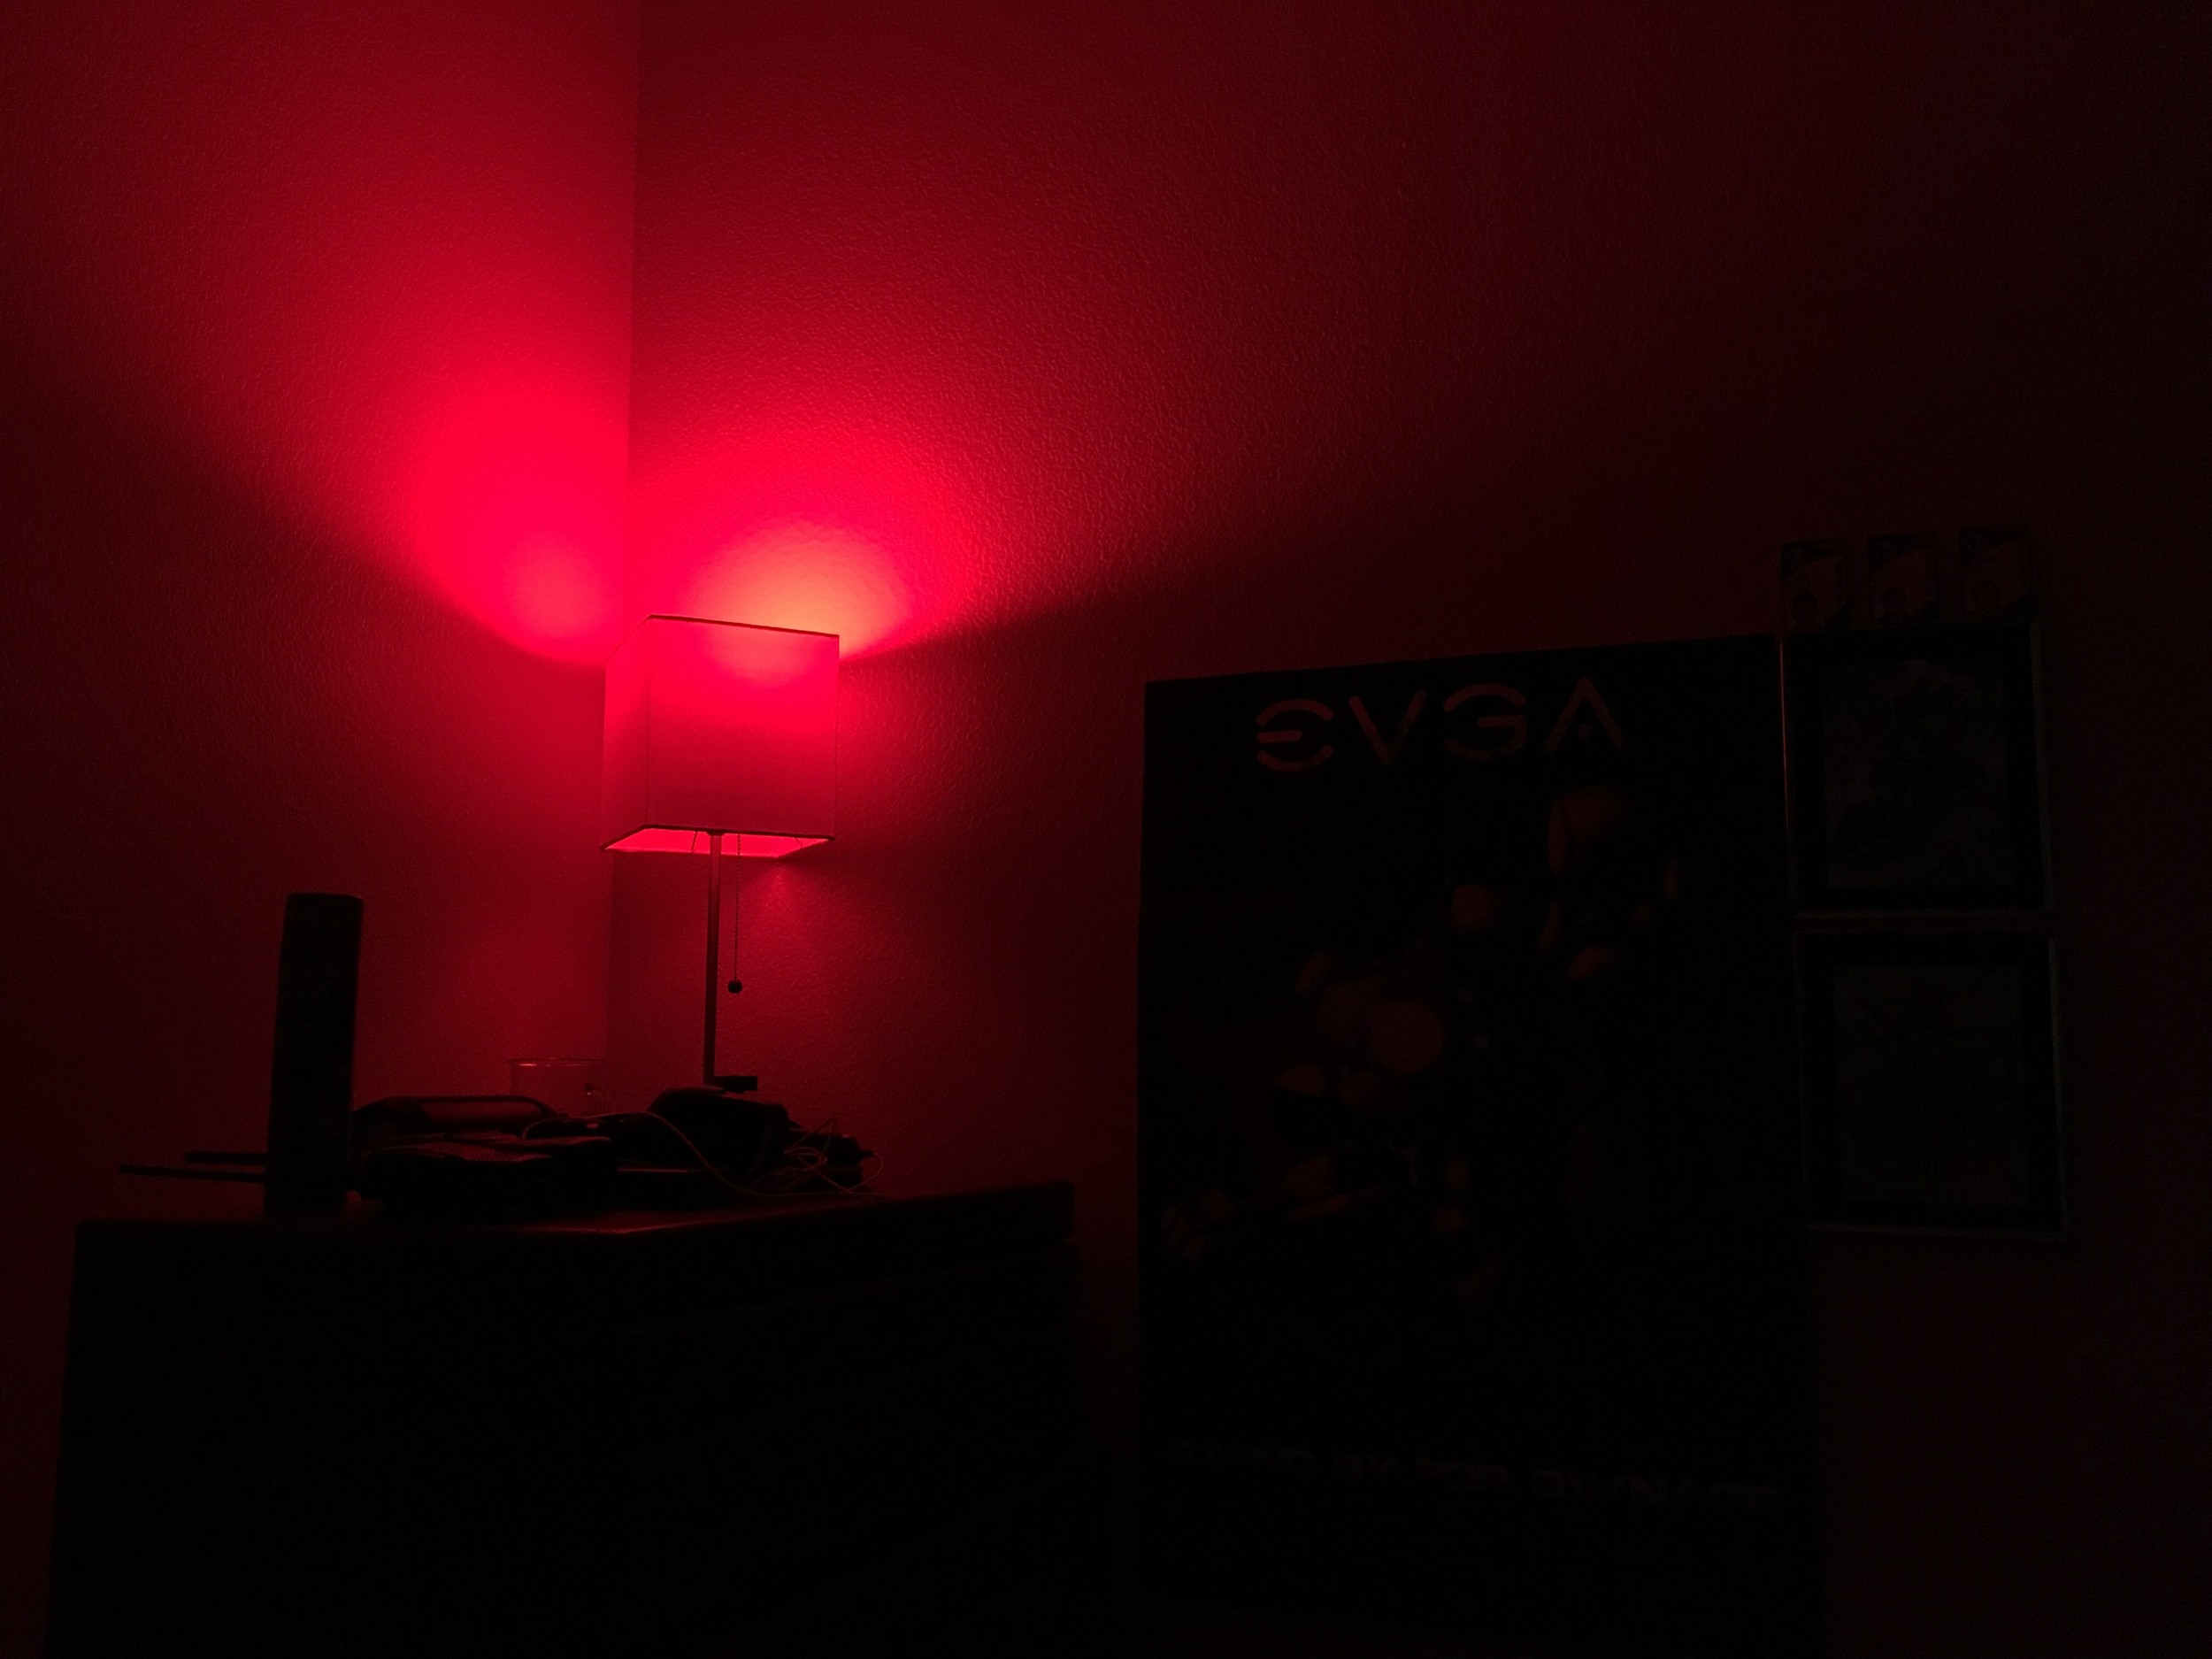
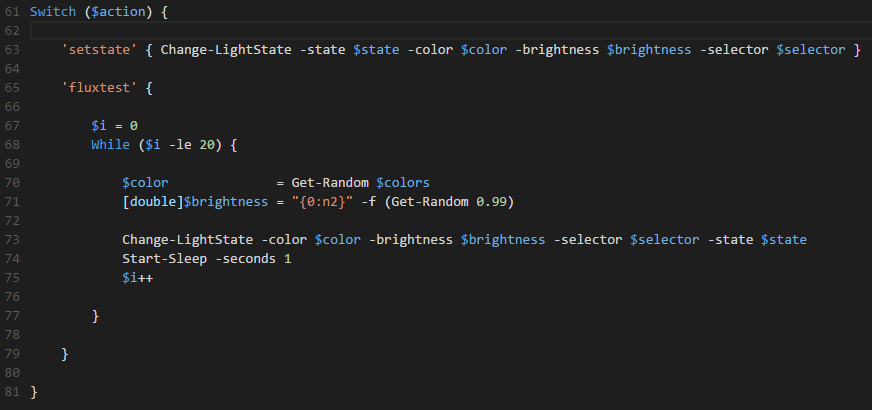
For this next example, I will utilize a loop, and our new function, to confuse my girlfriend. Well, with all the testing I've been doing... maybe not anymore ;)
Here's the code:
And off we go!
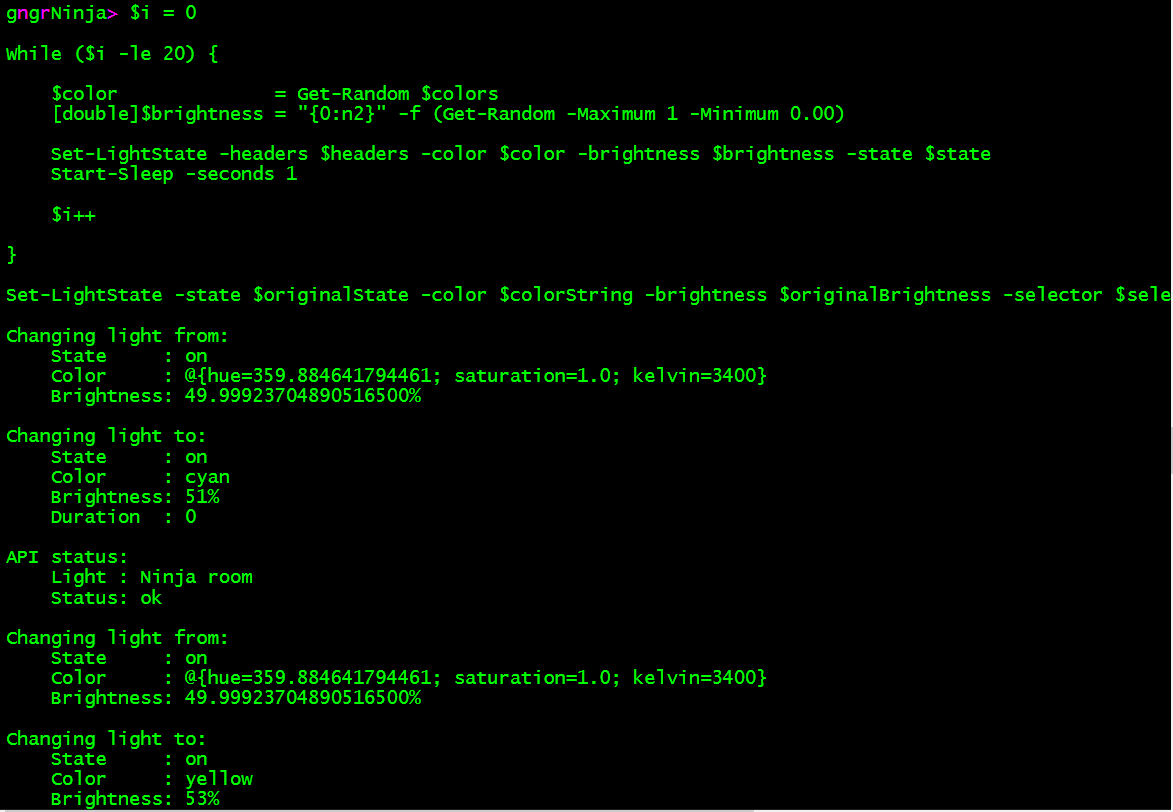
It worked!
At the end it will set the light back to the value it was discovered with:
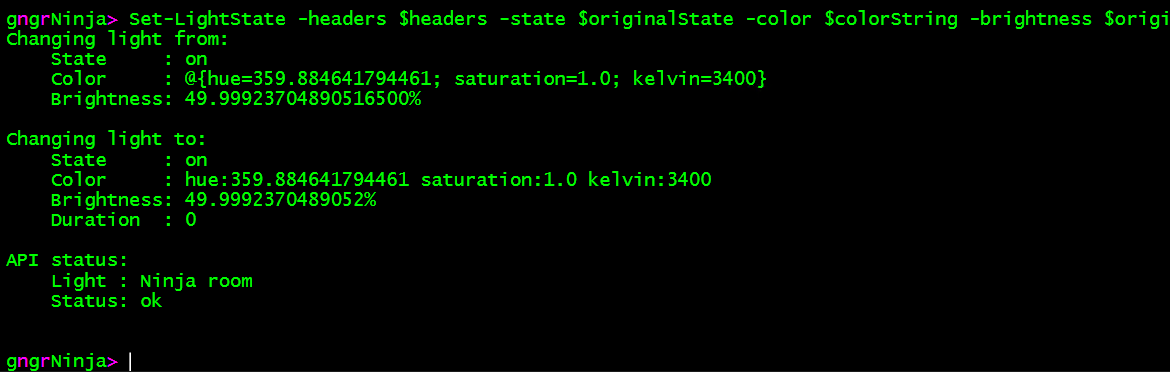
If you'd like a deeper dive into this, check out my post on using the Lifx API with PowerShell, here: http://www.gngrninja.com/script-ninja/2016/2/6/powershell-control-your-lifx-light
Some APIs authenticate you via including a username/password (hopefully eventually password hash) in the request URL. PRTG has one of those APIs. PRTG is one of my favorite monitoring tools, as not only is it great out of the box, but it also has great synergy with PowerShell.
PRTG information:
Let's start by getting the credentials of the account you want to use with the API. This account will be an account that has access to do what you need to do in PRTG. I will use the PRTG admin account, but you'll want to ensure you use one setup just to use with the API.
If you're demoing PRTG, and are using a self-signed cert, you'll need the following code to allow Invoke-RestMethod to work with the self-signed cert. This code will only affect your current session.
Now let's setup a variable that contains our PRTG hostname, and a custom object with information for the API URLs.
Next, per PRTG's documenation, we'll construct the URL we need to use to get the password hash.
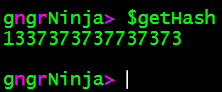
Now we can finally use Invoke-RestMethod to get the hash:
Let's make sure $getHash has our password hash.
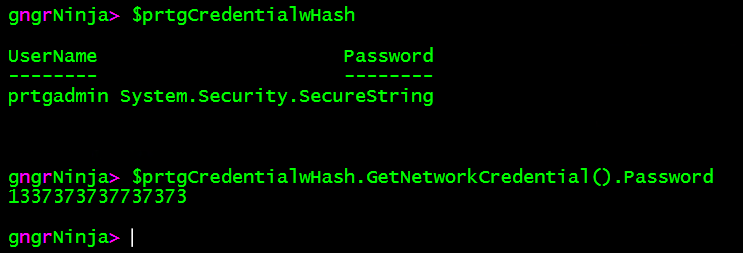
Alright, got it! Now we can create a new PS Credential object to store our username, and password hash (instead of our password).
First. we'll convert the hash we created into a secure string. Then, we will create a new PS Credential object using the username we specified in $prtgCredential, and the secure string we just created as the password.
We can then verify the information by displaying the contents of $prtgCredentialwHash, and also using the GetNetworkCredential().Password method.

Now that we know $prtgCredentialwHash contains what we need, we can construct a URL to test out the API.
Let's set some variables up:
We can check the value of $credentialAppend to ensure it is correct:

Now to construct the URL, and test out the API via Invoke-RestMethod.
Note: The full URL that is constructed is (I cut out my actual password hash on purpose, you'll see your hash after the = if all went well):
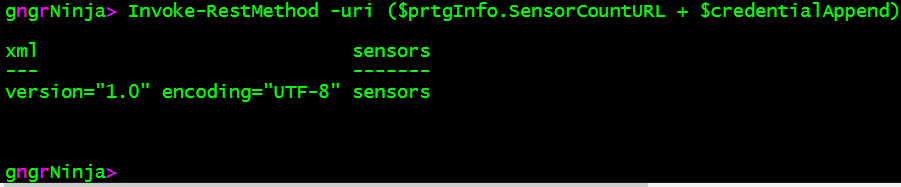
If all went well, you will see the results of the request (if not, you'll see an unauthorized message).
Success!
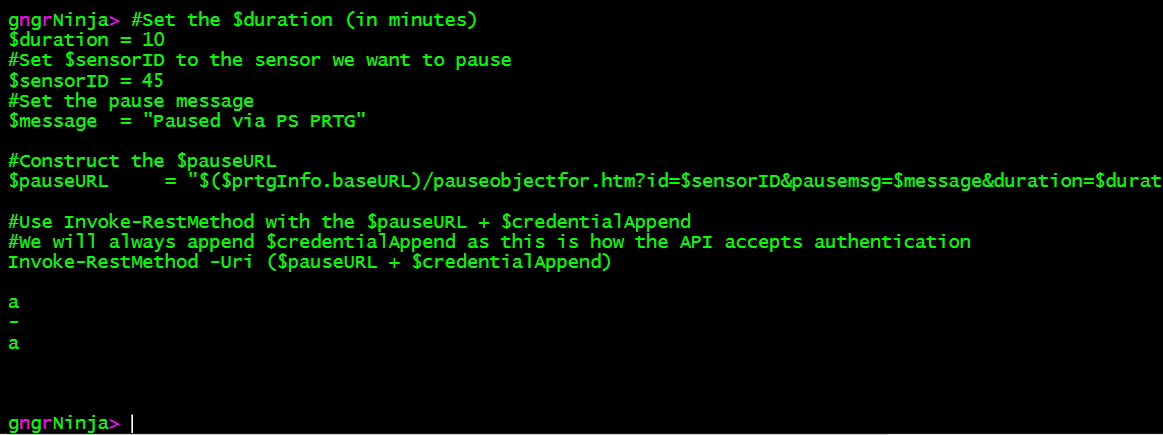
The PRTG API accepts data in the URL of the request. The below example will pause a sensor for a specific duration, with a specific message:
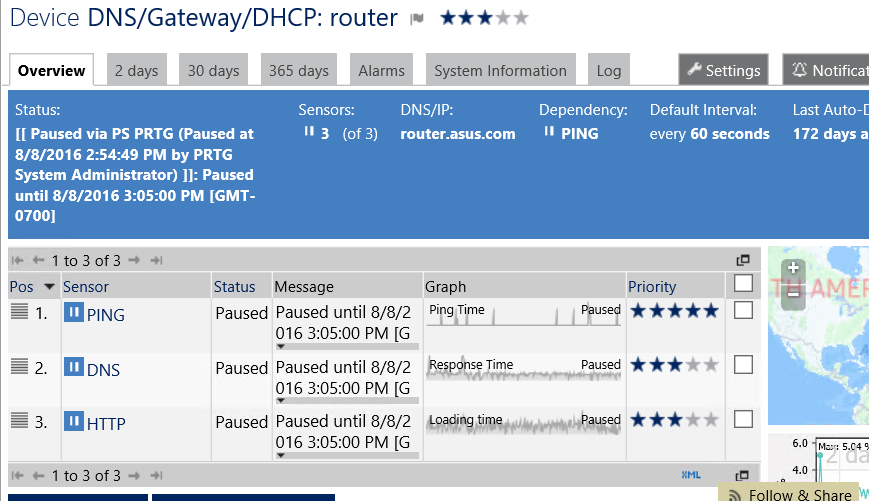

Awesome, it worked!
This last example contains some concept code for a project I'm working on. Feel free to judge and use it as you wish, however I will note now that it is nowhere near finalized. I'm still in the exploration, see what's possible, and try to get it all to work phase.
Requirements for concept code to work:
- PRTG Installaction
- Folder structure
- Module
- NinjaLogging.psm1 (included in ZIP file below)
NOTE: I have not fully cleaned up or officially released any of the code yet. That includes the logging module.
Here is my TODO list for the code:
- Upload it to GitHub
- Clean up/add error handling
- Create readme files
- Add parameter sets to some of the psprtg.ps1 functions
- Fully convert psprtg.ps1 to a module
- Add functionality to psprtg.ps1 to include an 'oh crap!' undo feature
- This will include exporting a custom object with the device ID and action taken
With that said, here is a link to download it (or you can skip to the code if that's all you want to see):
How to get it working/examples:
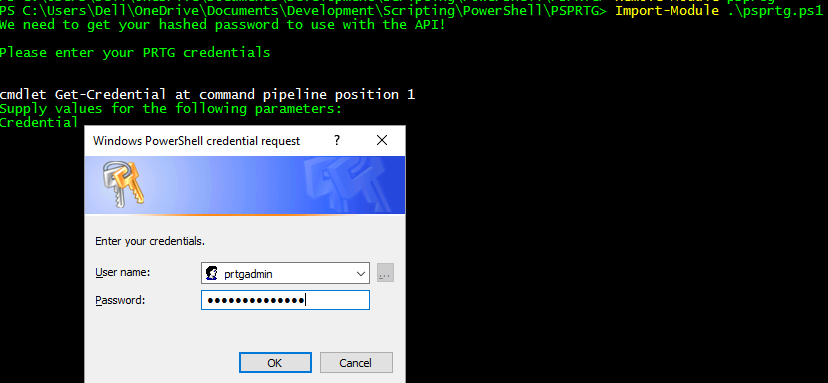
- Import the script as a module via Import-Module .\psprtg.ps1
- The first time you do this, it will ask for your PRTG credentials. The module will then export the credential object to the input folder, and then use that exported credential the next time the module is used
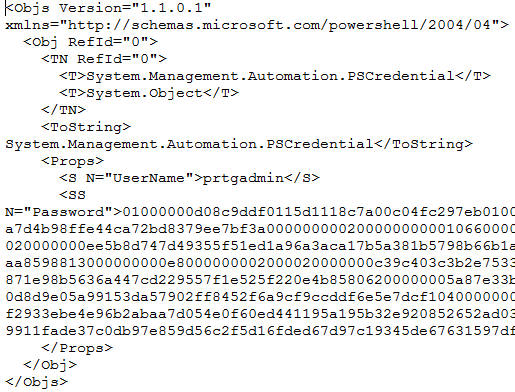
- Contents of machine/user encrypted credential file stored in the input directory:

- Find a device and pause it via Invoke-SensorModification -findDevice
- Note: You can also specify -Duration and -Message
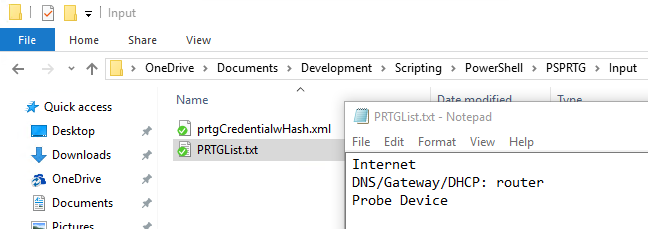
- Use a text file list of devices to find and take an action on

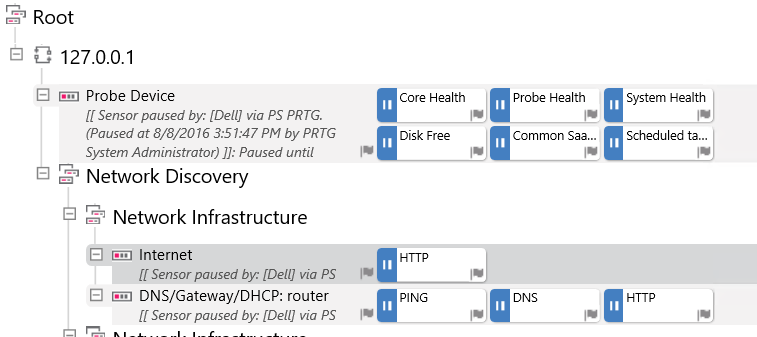
Pausing example:

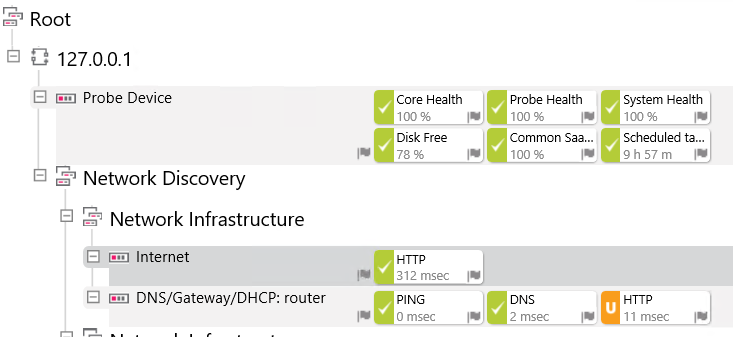
Resuming example:
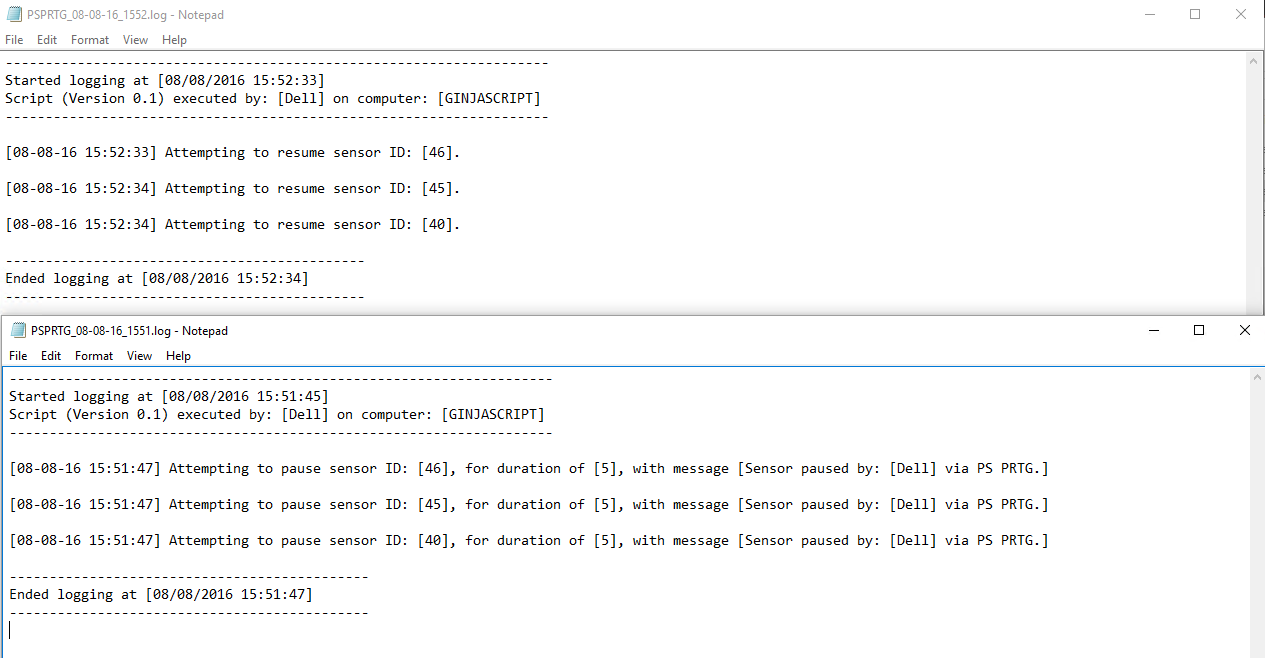
Log File Contents:
psprtg.ps1
NinjaLogging.psm1
Notes:
- I've spent some time on the help with the NinjaLogging.psm1 module
- Feel free to browse through and use it as you wish, let me know if you have any problems!
- I have not finished the email sending feature
- This code will eventually find its way to Github, and be a lot more polished
- Find an API for an application you'd like control with PowerShell
- Study up on the documentation, and find ways to send data to it
- Automate something using what you've learned today
Comments
No comments yet. Be the first!